 |
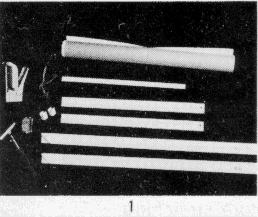
1. After determining the required canvas size, for example, 24" x 36", select the corresponding sizes of stretcher strips and make up a frame by fitting together the mitered ends. |
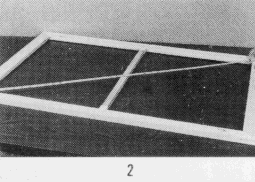 |
2. Check the squareness of the frame by measuring across the diagonal corners fo that both measurements are equal. If bracing is desired for a larger size, attach snugly with provision for later expansion. |
 |
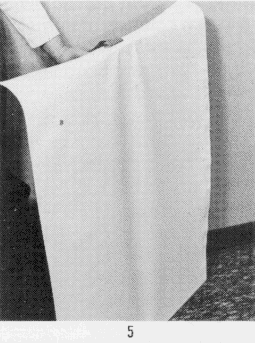
3. Spread the canvas on a clean flat surface, primed side down. Position the frame for best material yield, allowing from 1 1/2" to2" excess for gripping and stretching, depending on the type of stretcher frame. Cut out canvas segment. |
 |
4. Fold one side of the canvas over a short end of the frame, and tack at the center of the strip, allowing for 1 1/2" - 2" excess. |
 |
5. Reverse to the opposite side, using canvas pliers to grip the canvas in the left hand (for a right-handed person) with the frame resting in an upright position, primed surface facing you. |
 |
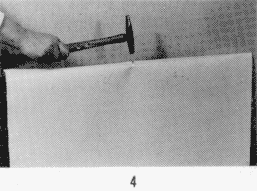
6. With a tight grip on the pliers, pull firmly until a straight crease is formed running from the pliers to the tacked end. With your right thumb, insert the tack while maintaining plier tension at the top of the crease, and tap in. A magnetic-head tack hammer will allow you to pick up the tack with one hand and insert it faster, using the other side of the hammer to tap in. When using a staple gun instead of tacks-and-hammer, the left hand pliers function is unchanged, and the stapling method replaces tacking. |
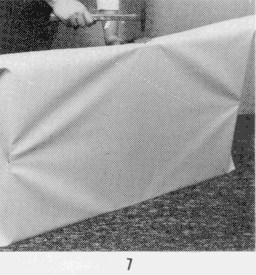 |
7. Move to an adjacent side and follow the same procedure, pulling firmly and tacking canvas to the frame at the center, creating first a triangle crease and then a diamond crease in the canvas with the fourth tack, at the opposite long side. Then temporarily tack canvas at each corner on short side only. Work out from center of long side. |
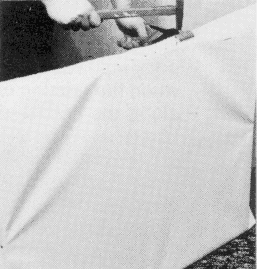 |
8. Move the pliers about 2 inches to one side, pull tightly, and tack to the frame. Repeat for several more inches in both directions from the center, then reverse to the opposite side and continue the process. Pull out tacks from the corners of short side and tack or staple from the center to the edges. Repeat the same procedure on one adjacent side and then its opposite. Depending upon the size of the canvas, and entire side can be tacked at one time, or for larger sizes, the canvas should be rotated several times before it is completely stretched. A linen primed canvs, particularly an oil-primed linen, will normally require more closely spaced tacks as there is limited stretch to the fabric. |
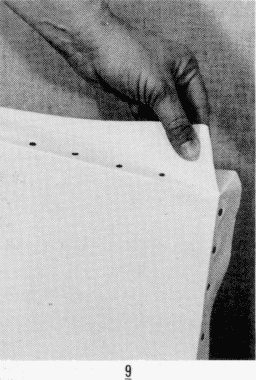 |
9. Leaving about 2 inches untacked at both ends of the inner sides, tuck in the corners as illustrated and tack through the folded canvas into the frame with exerting finger tension. |
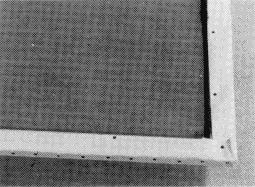 |
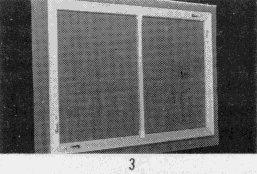
10. Fold the excess canvas to the back of the frame and tape or tack, to allow for removal and remounting in the future. If the canvas is trimmed flush with the back of the frame it will be difficult to remount properly without reducing the size of the frame. |
11. Avoid using pegs to take out wrinkles as this may throw the frame out of square, damage the canvas, or enlarge the stretcher frame so that it may not fit a standard picture frame. Restretch the wrinkled portion instead. The use of pegs should be confined to its proper purpose of mounting raw canvas for priming on the stretcher frame, after the initial sizing has dried.
12. On acrylic primed canvas only, small indentations and ripples may be flattened out by dampening only the affected area with a damp sponge and allowing it to shrink back to its original shape. However, always use care not to saturate the canvas, and allow it to dry completely in a well ventilated area. Large wrinkles should be removed by restretching the affected area, or the entire canvas if necessary. It is relatively easier to stretch raw canvas than primed, but considerable skill is required to prime the canvas with a quality ground. It is also easier to stretch primed cotton and Polyflax canvas than primed linen canvas, as the linen fibers do not have much stretch. Oil primed (and in particular; double primed) canvas requires the most care in stretching, as there is practically no stretch, and it is not at all unusual to have to remove some tacks at wrinkled areas, Restretch and re-tack, before getting the canvas perfect.Please note: DO NOT wet back of oil primed canvases.
Thanks to Tara Materials for the above information.
Copyrighted 1994 Fredrix Artist Canvas, Inc.
- Green art supply product
- Drop Ship - Item is shipped from manufacturer
- Oversized - Additional shipping may apply
- Item Ships via Truck - Additional shipping will apply
*Free Shipping Offer valid for single package non-oversized shipments over $100.00 (after all applicable coupons have been applied) and under 20 lbs. within the 48 contiguous United States only. All other areas must pay shipping and handling charges. Exclusions apply. Orders for stretcher bars, cradled wood panels, stretched canvas, flammable items, closeout or discontinued merchandise cannot qualify for our free shipping promotion. We reserve the right to ship via the carrier of our choice.

Copyright © 1997 - 2025 by Rex Art Co. All rights reserved. Prices shown are in U.S. Dollars. Prices are subject to change.