FLOORCLOTH
APPLICATIONS & TECHNIQUES
Floorcloth paintings may be thought of as paintings on canvas that lie on the floor instead of hanging on the wall. Being placed on the floor subjects the painting surface to abrasion and dirt that a wall hanging does not encounter. Because of this, floorcloth paintings are prepared differently.
Floor Cloth Paint
- The paint used must be durable enough to withstand the abrasion of foot traffic and flexible enough to be rolled and unrolled during shipping or moving.
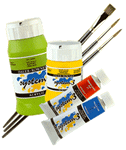
- Liquitex Professional Grade Artist Colors with a unique resin system offers artists the most durable acrylic paint suitable for floorcloth application
Durability
- Longevity is related to placement and the amount of foot traffic.
- Walking on the surface deposits dirt and damages the paint over time.
- Washing with abrasive cleaners will also damage the surface to the painting.
Materials Needed
- Heavy weight #8 Cotton Duck or Tara Floor Cloth. Lightweight canvas is less durable.
- Canvas should be 4"- 6" larger in each direction (horizontal and vertical) than the planned finished dimensions.
CANVAS PREPARATION
Washing Canvas
Washing the canvas insures minimum shrinkage and warping of finished floor cloth. Warping and buckling is exaggerated when the edges are later turned under.
- Wash canvas in a standard washing machine with a small amount of detergent.
- Air-dry and iron out wrinkles.
- Brush on 1 coat of Liquitex Matte Medium to backside of canvas. Let Dry.
- Flip canvas over and repeat step 3.
Priming Canvas
Many artists prefer to prime and paint canvas while it is attached to a rigid surface. There are two methods to achieve this:
- Wall Mounting
- Staple canvas directly onto studio painting wall.
- Plywood Mounting
- Staple canvas onto % -1 inch thick plywood that is larger than canvas.
Directions
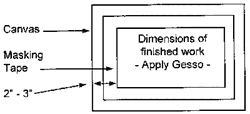
- Mark dimensions of finished canvas dimensions on front of canvas. There should a 2-3 inch border on each side.
- Tape off finish canvas dimensions with masking tape, to make it easier to turn under and glue the side edges.
- Apply Liquitex(D Professional Grade Gesso (white or colored) or mix gesso with Matte Medium (4 parts gesso - 1 part medium) for added flexibility. Let dry.
- Optional: Lightly sand the first coat of gesso or gesso/medium, then apply a second coat. Let dry.
Painting
Use Liquitex Protessional Grade Medium Viscosity Concentrated Artist Colors or High Viscosity Artist Colors. Medium Viscosity colors will dry to a less textured surface. A lower surface is subject to less abrasion and retention of dirt.
Final Protective Varnishing
After the floorcloth is complete and fully dry for 48 hours, Soluvar) Final Varnish should be applied to extend the life of the floorcloth by protecting it from pollution and dirt. This varnish is removable, to allow future removal of dirt and scuff marks.
Floorcloth varnishing is a two step process: An isolation varnish and the final removable varnish.
Refer to Liquitex Varnishes for application instructions.
Edging the Sides
- After Soluvar has completely dried 1-2 weeks, remove the stapled floorcloth from the wall or plywood.
- Turn canvas over and gesso the entire back of the floorcloth. Let dry.
- Remove masking tape from border.
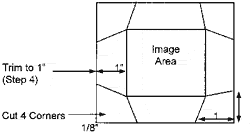
- Trim unpainted canvas edges ("hem") to approximately 1".
- At each corner, measure in 1 1/8" in both directions and cut the unpainted canvas edges to the exact corner point of the painted canvas. You are cutting away each corner.
- Fold over the four unpainted edges (2 vertical, 2 horizontal). Create a crease by pressing where the painted canvas ends and the unpainted canvas begins.
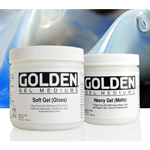
- Apply Matte Gel Medium to the back of each edge and press firmly. Put under even weight and let dry 24-48 hours. Do not lift weight off until completely dry.
- Apply Matte Medium to the outer surface of the edges to seal.
Shipping
- Select a sturdy tube 8-12" in diameter.
- Lay painting face down and roll.
- Avoid rolling painting if temperature is below 50 F.
Cleaning
- Apply warm water or soap and water to surface with soft mop.
- Do not clean with ammonia or ammonia based products.
Removing Liquitex Soluvar Final Picture Varnish
When the surface gets dirty or scuffed, it can be restored by removing and recoating the Soluvar Varnish.
Refer to Part I Liquitex Varnishes for removal instructions.