![]()
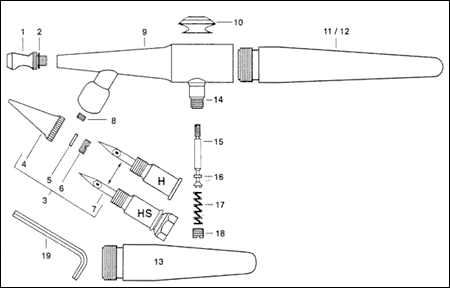
Exploded View and Parts List
See Below for daily Operation , Cleaning and Opening a Clog
This is the newer style "H" airbrush - see below for old style
Parts List
Numbers correspond to items above. Please refer to actual manufacturers number (ie. A-23A) when placing order or calling for information (not the list number, ie. 18.)
| 1,3,5 Aircap
2. 3A-4 "O" Ring 3. H-1,3,5 Color Adjusting Part 4. HT-1,3,5 Tip 5. H-185 Packing 6. H-184 Nut 7. HNS-1,3,5 Needle W/Swivel Nut 8. H-153 Set Screw (SS) 9. H-150N Shell (includes H-128A) 10. H-155 Finger Button 11. H-143 Handle (Nylon) 12. HVL-202 Metal Handle (standard lenght) 13. HVL-203 Metal Handle (stubby) 14. H-128A Valve Casing 15. H-192 Valve Plunger 16. A-52 Valve Washer (12) |
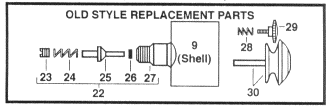
17. A-22 Valve Spring 18. A-23A Air Valve Nut 19. F-186 Wrench 20. A-34 Hanger 21. V-62 Wrench OLD STYLE PARTS 22. H-175A Air Valve Assembly 23. A-23A Air Valve Nut 24. A-22 Valve Spring 25. H-21A Valve Plunger 26. A-52 Valve Washer 27. H-128A Valve Casing 28. A-143 Needle Guide Spring 29. H-156 Stipple Adjuster 30. H-157 Finger Lever Assembly |
Approximate Working Pressures:
* 20 lbs. or Less: Stipple and granulated effects, pressure will vary with viscosity of fluid.
* 20 to 30 lbs.: Medium consistency water colors, inks & dyes.
* 30 lbs. or More: Heavy fluids, acrylics, reduced lacquers,
varnishes, paints or ceramic glaze.
Sizes-
o H-1 Color Part and HC-1 Aircap for light fluids.
o H-3 Color Part and HC-3 Aircap for medium fluids.
o H-5 Color Part and HC-5 Aircap for heavier fluids.
1. Attach hose to air supply and allow air to blow a few seconds. Shut off before attaching to Airbrush. This procedure will remove dirt from airline and hose.
Caution: Hold firmly and point away from face.
2. Attach AC-20 (1/8"-1/4"-40) thread Coupling to the Airbrush Wrench tight.
3. Attach Color Cup or Bottle to HN-1, 3, or 5 Needle by exerting a firm twisting motion to fit tapered tube securely into tapered Needle inlet. For HNS-1 t 3 or 5 fasten swivel nut to threaded coupling on bottle. To remove Color Cup from HN- Needle, exert a backwards twisting pulling motion.
4. Fill Color Cup or Bottle 1/2 to 3/4 full. Use eyedropper or brush for adding small amounts of color to cup. When using Color Bottle, vent hole must be kept open.
5. To Spray, hold Airbrush like a pencil comfortably between thumb and forefinger using middle finger as a guide and support. Like writing, hold forefinger easily on H-155 Finger Button and Press to open air valve.
6. Regulate volume of color and size of spray by rotating HT-1, 3 or 5 Tip clockwise to increase and counter clockwise to decrease flow of color.
7. Stipple Adjustment: Reducing the airline pressure is the easiest method used when creating a stippled effect with the airbrush. Pressure can be reduced by allowing air to bleed (be released) from any of the following items: D535 Bleeder Valve on the D500 Compressor, 3A Needle Valve installed on the H-128A Valve Casing of the Airbrush or the Escape Valve on the D Compressor.
1. Pour any remaining color back into its original container.
2. Wipe Color Cup or Bottle clean, using cloth moistened with proper solvent.
3. Hold Airbrush at a downward angle and put a few drops of solvent through the H- or HS- Color Adjusting Part Assembly. To flush out the remaining color in the H or HS Color Adjusting Part Assembly, apply pressure to the H-1 55 Finger Button.
4. Apply a tiny dab of Vaseline to the H- or HS- Color Adjusting art and HC- Aircap threads every two or three months to prevent color build up and consequent freezing of the Color Adjusting Part Assembly and Aircap.
1. Agitate color in Bottle Assembly by placing finger momentarily over HC- Aircap while air is passing through the Airbrush. This will blow color back into bottle thus opening clogged fluid passages. Do not do this with a cup as color may blow out of cup.
2. Should H-1, 3 or 5 Color Adjusting Part Assembly become clogged, loosen H-153 Set Screw, unscrew HT-1, 3 or 5 Tip from HN- or HNS- Needle, gently pull back through ball-shaped support and remove Tip.
3. Clean Parts carefully, using nothing harder than a wooden toothpick.
4. To reassemble, reverse this procedure, making sure the shoulder of the Needle seats up against ball-shaped support.
5. If the needle and tip are completely clogged, soak in a closed bottle of proper solvent until clean.
Contents Copyrighted © 1997-2000 Rex Artist Supplies
![]()